Aeros Helicopter Plans Review
Do you want to build a homebuilt helicopter too? Our choices include kits, plans or starting from scratch with a blue screen and some very expensive books and software. For years I’ve wanted to build my own homebuilt helicopter. Early on, I attended many fly-ins taking pictures and measurements of the old Rotorway Scorpion helicopters.
I even bought the Scorpion helicopter plans – (Scorpion 1 and Scorpion 2 helicopter plans were available). While the plans were a great source of knowledge for an enthusiast, the marketing thrust was to steer potential helicopter builders to proceed by purchasing the series of kits as most everything in the plans was expressed in the least unable terms.
The early Adams-Wilson design helicopter was resurrected by Alf Crowe in New Zealand and I’ll bet I was one of the first to send away for those plans. Now I had something. Between the Scorpion helicopter plans and the A/W helicopter plans, I was ready to build. To date I’m still pondering, sketching, CAD’ing and puttering around collecting helicopter parts. Gee, I love aircraft parts. Maybe that’s why my friends call me a Certified Master Dissassembler.
As the Scorpion helicopter evolved to the impressive Rotorway Exec we see today, other kits were introduced to fulfill the desires of the helicopter builder. In the meantime, people like me who could not afford a kit helicopter or preferred a more time consuming and indirect route were offered little in the way of plans.
Ben Showers and Doug Schwochert have each updated and refined the old A/W designs with their respective SkyTwister helicopter and AW95 helicopters. More recently I came across helicopter plans available on the internet through a company called Windspire.
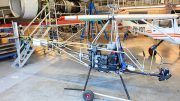
The Aeros Helicopter Plans Package offered by Windspire is based on a design that was flown back in the early 1970’s. Well, it sure looks like it’s flying. The plans include several photos of the original helicopter. Upon close inspection it appears there may have been two (2) of them, or at least one homebuilt helicopter that may have subsequently been modified from the original. It looks like the original Aeros helicopter was built somewhere in the West as mountains are visible in the plans package photos. I assume they are American mountains.
By comparison to the sleek Rotorway Exec helicopter, the Aeros is a bit of a homely looking thing. But what do you want for the 1970’s and you could learn to like this little machine as it tends to grow on you. A single place, air cooled, VW powered helicopter design, the Aeros helicopter construction plans cover over twenty (20) pages of photos, drawings and construction recommendations for a helicopter that is not likely to be completed or flown.
Aeros Homebuilt Helicopter Plans
I found the Aeros helicopter plans informative, very interesting and fun to study. They are comprehensive and well detailed in many areas. There are several areas however, that leave you “up-in-the-air” so to speak. One such area of concern for a potential helicopter builder is the main rotor transmission. It uses a Volkswagen ring gear and pinion mounted in a cast aluminum housing assembly machined to the plans specifications.
This certainly seems simple enough until you realize there is no apparent source for the aluminum castings to be machined. So, unless you’re good at pattern making and can have the aircraft grade housing pieces cast at an aluminum foundry, you aren’t going much further building the Aeros helicopter as designed.
I was rather amused by the instructions to machine the transmission cases which makes the assumption you have the required castings laying at the foot of your milling machine. I feel I am capable of producing the majority of the various pulleys, shafts, housings, brackets and other components of the Aeros helicopter, but for the machine shop challenged, these items may be very costly to have made.
Windspire states this plans built helicopter can be built in a well equipped shop. Well equipped is right! You would need a lathe, a milling machine, a rotary table and a nice compliment of tooling.
Were I planning to pursue the Aeros helicopter design concept, I would probably machine the transmission cases out of billet aluminum and try utilizing VW transaxle side covers. I’d modify the design to facilitate more accurate alignment and setup of the ring and pinion gears for the main rotor transmission.
I might also research ring and pinion gear sets other than VW to find gears that offer a variety of ratio selections, lighter weight, lower price and possibly better availability. I guess the old VW stuff does meet most criteria required for this experimental helicopter.
Input to the main rotor transmission is through the use of multiple V-belts on pulleys as well as the tail rotor V-belt drive pulleys to be machined from 7075T6 aluminum. Have you priced 7075T6 lately? I would be more inclined to use the more readily available and affordable 6061T6 aluminum.
An idler pulley in the V-belt arrangement provides a method of tensioning the belts to engage and disengage the engine from the rotor drive.
A freewheeling or sprag clutch is incorporated into the V-belt driven pulley. The homebuilt helicopter plans reference a part number for this clutch element, which I presume to be a VW part number, possibly out of an automatic transmission.
This element rides on and in two (2) components which require precision machining and specific heat treating that would be best left to a professional machine shop – one that can also produce internal splines and grind the surfaces to finish dimensions after roughing and heat treating. An industrial type sprag clutch would be a better and more economical choice.
The Aeros helicopter uses a sheet metal style tail boom by break forming aluminum and securing it to bulkheads that are again, castings. Four (4) separate castings are used to build the tapered tail boom. The cost and time involved to attempt to build patterns and have castings made is prohibitive. Therefore, a builder might seek to explore alternatives to the Aeros design in this area.
The airframe and cabin of the Aeros helicopter are built from a series of aluminum and steel pieces that are bolted and pop riveted together. The drawings in this area are easy to follow although a builder might be tempted to modify the design, possibly using a welded tubing arrangement in place of some of the fabricated pieces.
I was impressed with the design of the cyclic and collective controls. The plan photos were very helpful in visualizing how the system would be fitted together. Equally impressive is the quality of the plan details for the construction of the main and tail rotor assemblies with the exception of the rotor blades themselves.
Tail rotor blades use a D-style spar machined from aluminum. Machining these items would require a milling machine with a dividing head to rough in the airfoil shape or the use of a four (4) axis CNC machine to create a well finished part. Or, you could use a body grinder to shape these parts if you didn’t mind a Black and Decker airfoil. Blade skins are then formed over these spar pieces though the helicopter plans are a little sketchy here.
The homebuilt helicopter plans do not include drawings for the main rotor blades. The construction manual portion of the helicopter plans refers to the balancing of the rotor blades only.
They are balanced in both chord wise and span wise directions and the instructions state, “Your blade supplier should have information on accomplishing this”. To which I answered, “What blade supplier is that?” The plans have drawings for the rotor blade grips that show a machined radius where the grips contact the blade.
This is a radius and not an airfoil shape for if it were, it would complicate the machining of the grips. I envisioned the need to build a lathe fixture to accomplish this radius, assuming the builder was to follow this design to fit the specific blades of an unknown origin. Here is one of those areas where I would look at incorporating a different design to be able to mount purchased helicopter rotor blades.
The VW engine is mounted horizontally with it’s crank sticking out the side of the craft. This allows the tail rotor to be belt driven without the need for any right angle gear boxes. It’s a neat idea. Little is said about the VW engine other than it is modified to produce 95 plus horsepower.
This left me wondering about things like operating RPM and how much actual power might be needed? My theory of the horsepower required comes from my early days as a drag racer mixing nitro-methane. If some is good, more is better and too much is just right! We might call it “tipping the can”.
A part number for the VW ring and pinion gear set is provided and assuming your local V-Dub dealer can work with it, you would be able to work backwards from the helicopters main rotor RPM to determine the engine RPM.
I would want to know this before purchasing a ring and pinion gear set. This number would also be needed to help determine which VW engine, engine components and modifications would be needed.
Summary Of The Aeros Homebuilt Helicopter Plans Review
So, if you are like me and would like to build a helicopter, but are still in the research and design aspects of your project, the question is; Where do the Aeros helicopter plans fit into the overall picture? And, is it a design worthy of consideration?
The answer is YES, and NO. I would venture to say no one is likely to complete a plans-built Aeros helicopter without some serious design modifications.
On the other hand, the Aeros homebuilt helicopter plans are an excellent source of continuing design study and are just plain fun to noodle over. I think they are well worth the money and would encourage anyone interested in learning more about building helicopters and the Aeros design to buy the plans.
The Aeros plans are available on the web from new suppliers Vortech where you will be able to see a couple of photos.
As for my project, my latest hot flash is to build my garage potato… Oops, I mean helicopter using a turbine engine. So, if you have a T63-A700 engine sitting around collecting dust…. consider me. Happy rotorcrafting.
…From Vortech
The Aeros is one of the most superbly engineered single-place helicopters we have seen. The Plans manual offers page after page of highly detailed construction prints, photos and assembly instructions to guide the builder This single-seat helicopter can be built in a well-equipped home shop.
It features a bolt-together main frame and a conventional helicopter control system: full collective with a twist-grip throttle, full cyclic and foot-operated tail-rotor pedals. For low cost and reliability, the drive train utilizes a converted VW car engine and a primary belt drive that leads to a geared transmission with VW gears.
The belt-driven tail rotor is high-mounted to minimize the rolling moment caused by tail-rotor thrust. A number of weight-saving features have gone into the design of the Aeros. including a simple, but attractive monocoque tail boom.
The Aeros is licensed as an Experimental Aircraft. The Aeros is only available in the form of our detailed construction manual, and suppliers of all parts and materials are listed in this Guidebook.
| Aeros Plans Built Helicopter Specifications | |
|---|---|
| Length | 18 ft |
| Height | 7 ft |
| Width | 5 ft |
| Main Rotor Diameter | 21ft 11in |
| Main Rotor Chord | 7.5 to 8 in |
| Main Rotor RPM | 460 |
| Disc Loading | 2.5 lbs/sq. ft |
| Tail Rotor Diameter | 40 in |
| Tail Rotor Chord | 3.5 in |
| Empty Weight | 544 lbs |
| Useful Load | 356 lbs |
| Speed (max) | 85 mph |
| Range (max) | 65 miles |
| Engine | Volkswagen |
| Horsepower | 95+ |
| Power loading | 9 Ibs./h.p. |
| Fuel Capacity | 12 gal. |
| Fuel Consumption | about 4 gal./hr |
| Service Ceiling | 12,000 ft |

More information on the Aeros helicopter including plans can be found here: Vortech
DO NOT USE GMAIL OR YAHOO ACCOUNTS TO ORDER THESE PLANS! – 1. Gmail and Yahoo blocks our server, why? we do not know. 2. Gmail and Yahoo limits the size of the download, so we cannot send it manually! 3. Gmail and Yahoo blocks our email address or places it in your spam folder – so we have NO WAY of communicating with you or responding to your emails.




Be the first to comment on "Plans Built Aeros Homebuilt Helicopter Review"